
Peppermint Snowball Cookies
Soft, buttery Peppermint Snowball Cookies dusted with powdered sugar and filled with cool peppermint flavor. These melt-in-your-mouth Christmas cookies bring cozy winter vibes and holiday joy to every bite.

By Emma & Ella FrostUpdated June 13, 2026

- Prep Time
- 15 min
- Cook Time
- 8 min
- Total Time
- 23 min
- Servings
- 24 cookies

5-Ingredient Dump & Go Crockpot Meals
101 effortless slow cooker recipes for busy families.
View on AmazonAvailable on AmazonEvery Christmas, my kitchen smells like butter, sugar, and peppermint it’s my happy place. These Peppermint Snowball Cookies are the little bites of holiday joy that melt in your mouth and sparkle with powdered sugar. They’re soft, buttery, and perfectly minty like snowflakes you can eat. One batch and suddenly, it feels like Christmas morning again.
Table of Contents
Table of Contents
The Story & What Is Peppermint Snowball Cookies
The first time I made Peppermint Snowball Cookies, it was a snowy evening just before Christmas. I was a teenager, home from school, watching snow pile up outside the window while Mom pulled trays of cookies from the oven. That smell sweet butter and cool peppermint became my personal definition of the holidays. Now, every December, I bake these to bring that same warmth back.
These cookies are light and crumbly, dusted in powdered sugar so they look like fresh snowballs. One bite reveals their delicate texture and burst of minty flavor from peppermint chips. They’re everything I love about holiday baking: simple ingredients, comforting aroma, and a touch of magic.
Unlike fancy layered desserts, snowball cookies are wonderfully easy. Just a handful of pantry staples and a bit of patience for chilling time and suddenly you’ve got the perfect cookie to share with friends, family, or anyone who loves peppermint.
If you’re a fan of classic winter sweets like our Christmas Sugar Cookie Cheesecake, these cookies bring that same festive spirit in bite-size form. They’re perfect for gifting, holiday cookie swaps, or serving next to a mug of hot cocoa.
For an easy no-bake companion on your dessert tray, try pairing them with our No-Bake Coconut Cream Balls. The soft minty flavor of these cookies blends beautifully with coconut’s gentle sweetness like a tropical winter wonderland.
And when the holidays get busy (because they always do), I keep a stash of quick ideas like our 11 No-Bake Cookies and Bars in 15 Minutes for fast, festive variety. These peppermint snowballs add the handmade charm that ties the whole platter together.
If you love winter desserts that feel both nostalgic and fresh, you’ll adore these cookies. They bring the comfort of tradition with just enough sparkle to make your dessert table shine brighter than a string of Christmas lights.
Why You’ll Love Peppermint Snowball Cookies
There’s something magical about the way Peppermint Snowball Cookies melt on your tongue. They’re buttery, crumbly, and dusted with sweet snow soft enough to break apart with the lightest touch. Every bite brings a refreshing hint of peppermint that feels like winter itself. These cookies aren’t just treats; they’re moments of nostalgia wrapped in sugar.
Comfort in Every Bite
Baking these cookies feels like slipping into your coziest sweater. The dough mixes in minutes, the scent fills your kitchen, and before you know it, your counter’s covered in powdered-sugar snow. Each cookie has that buttery richness of shortbread with a subtle peppermint sparkle refreshing but never overpowering.
They’re a perfect cross between classic shortbread and a minty truffle, making them melt-in-your-mouth soft but satisfyingly rich. If you’ve tried our Fruity No-Bake Desserts, you know how much we adore desserts that balance flavor and texture just right these deliver that same perfection in every bite.
Holiday Vibes, All Wrapped Up
Peppermint Snowball Cookies belong on every Christmas cookie platter. Their pink-and-white hue makes them look festive and fun, especially when paired with something bright like our Baby Lemon Impossible Pies Recipe. Together, they create a dessert spread that’s cheerful, colorful, and completely irresistible.
You’ll love how easy these are to customize, too. Add a few crushed candy canes for extra crunch or drizzle them lightly with melted white chocolate. They’re elegant enough for a gift box but simple enough for a weeknight bake.
These cookies are also wonderfully make-ahead friendly perfect for when the holiday chaos kicks in. Mix your dough a day early, chill overnight, and bake fresh the next day for stress-free holiday magic.
Texture & Flavor Table
| Element | Flavor & Feel |
|---|---|
| Cookie Base | Buttery shortbread texture, soft and crumbly |
| Peppermint Chips | Sweet, refreshing mint crunch |
| Powdered Sugar Coating | Light, snowy sweetness |
| Overall Taste | Balanced blend of butter, sugar, and cool peppermint |
Why They’ll Steal the Show
Every cookie tray needs a standout and this one delivers. Their delicate pink hue, frosty coating, and cool flavor make them the perfect contrast to rich chocolates or spiced cookies. I love gifting these alongside a batch of our No-Bake Coconut Cream Balls for a mix of textures that delight everyone.
And here’s a secret: they taste even better the next day. As they rest, the peppermint flavor deepens slightly, blending beautifully with the buttery base. It’s the kind of cookie that makes you stop mid-conversation and smile after the first bite.
How to Make Peppermint Snowball Cookies
If you’re craving something that feels like Christmas in a single bite, these Peppermint Snowball Cookies are it. They’re simple, festive, and full of buttery peppermint joy. Let’s make a batch together it’s easier than you think, and your kitchen will smell like pure holiday magic.
Quick Overview
| Step | Description |
|---|---|
| 1 | Cream butter and powdered sugar until light and fluffy. |
| 2 | Add flour, salt, peppermint extract, and food coloring. |
| 3 | Stir in peppermint chips, chill dough for 30 minutes. |
| 4 | Shape dough into balls and bake until just set. |
| 5 | Roll warm cookies in powdered sugar to create that snowball look. |
Ingredients
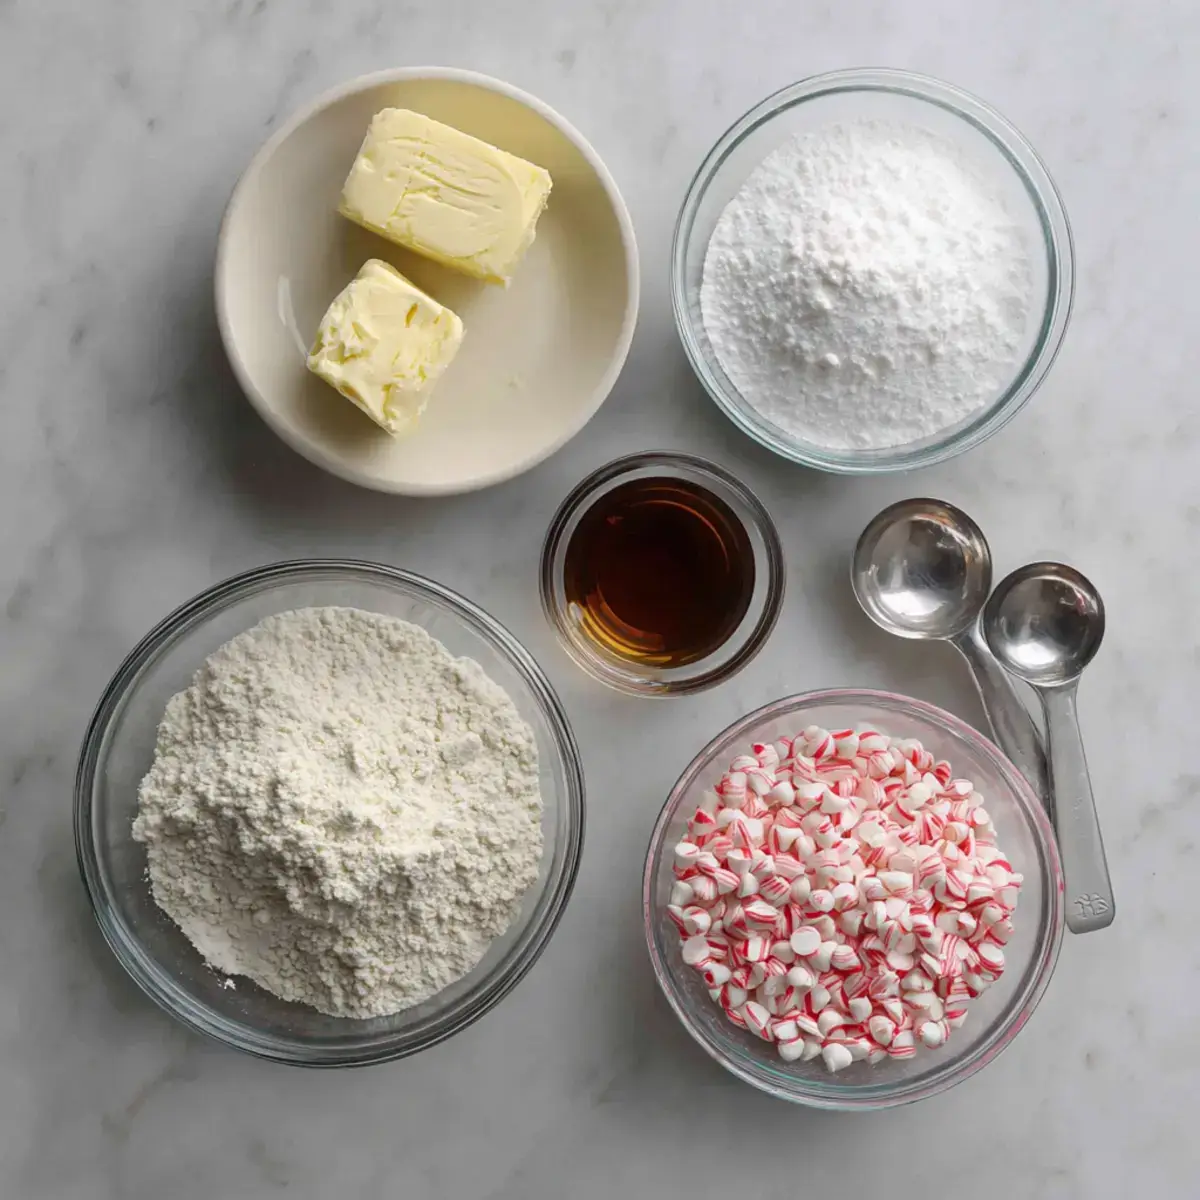
For the Cookies
- 1 cup unsalted butter, softened
- ⅔ cup powdered sugar, sifted
- 2¼ cups all-purpose flour (spooned and leveled)
- ½ teaspoon salt
- 1 teaspoon peppermint extract
- Red or pink food coloring
- ¾ cup Andes peppermint baking chips
For Coating
- Additional powdered sugar for dusting and rolling
These ingredients create cookies that are melt-in-your-mouth tender. The peppermint extract adds just enough coolness, while the chips give little bursts of flavor in every bite.
Step-by-Step Instructions
1. Cream the Butter and Sugar
In a large mixing bowl, beat the softened butter and powdered sugar together for about 2 minutes until smooth and fluffy. This step creates the cookie’s tender texture and buttery flavor.
2. Add the Dry Ingredients
Mix in the flour, salt, and peppermint extract just until combined. Avoid overmixing the goal is to keep the dough soft and delicate.
3. Add Color and Peppermint Chips
Drop in a few drops of food coloring (red or pink). Stir gently until evenly tinted, then fold in the peppermint baking chips.
4. Chill the Dough
Cover the bowl and refrigerate for at least 30 minutes. This helps the dough firm up, so the cookies hold their shape while baking.
5. Bake
Preheat your oven to 375°F (190°C). Line a baking sheet with parchment paper or a silicone mat. Scoop about 1 tablespoon of dough, roll into balls, and place 2 inches apart. Bake for 7–8 minutes, or until the bottoms are just barely golden.
6. Coat in Powdered Sugar
Let cookies cool on the pan for 5 minutes, then transfer to another sheet covered in powdered sugar. Roll each cookie gently until fully coated, then dust again once completely cooled.
Baking Table
| Bake Time | Temperature | Cookie Texture | Yield |
|---|---|---|---|
| 7–8 minutes | 375°F | Soft and crumbly | About 24 cookies |
Cozy Tip from Nora
For an extra-festive touch, sprinkle crushed candy canes over the top before serving. The red-and-white sparkle looks beautiful next to a cup of hot cocoa or even our Christmas Sugar Cookie Cheesecake.
And if you’re planning a cookie exchange, pair these snowballs with some No-Bake Coconut Cream Balls they balance each other perfectly with texture and sweetness.
What to Serve Peppermint Snowball Cookies With
There’s something magical about pulling a tray of Peppermint Snowball Cookies from the oven warm, fragrant, and dusted like little winter clouds. They’re the perfect holiday cookie to serve with cozy drinks, bright fruit desserts, or even a few chocolatey bites for contrast.
Cozy Drink Pairings
| Drink | Why It Works |
|---|---|
| Hot Cocoa with Marshmallows | The deep chocolate richness pairs perfectly with the cool peppermint flavor. |
| Peppermint Mocha | For double the minty goodness like Christmas in a cup. |
| Chai Latte or Spiced Tea | The cinnamon and cloves enhance the buttery sweetness of the cookies. |
| Warm Vanilla Milk | A soothing, kid-friendly option that balances the peppermint’s coolness. |
These pairings bring warmth to chilly December evenings. I love arranging the cookies in a basket, next to mugs of steaming cocoa, just before guests arrive it’s simple, nostalgic, and sets the coziest holiday mood.
Sweet & Savory Pairings
If you’re planning a dessert spread, these snowballs play beautifully alongside a few other holiday favorites. I often make a platter that includes our Christmas Sugar Cookie Cheesecake for a creamy contrast, and maybe a few fruity bites from our Fruity No-Bake Desserts for balance.
The mint flavor also cuts through richness beautifully, so pair them with chocolate truffles or fudgy brownies for a stunning texture contrast. And if you want a fun no-bake addition, try our 11 No-Bake Cookies and Bars in 15 Minutes; they add quick, chewy sweetness to any cookie tray.
Presentation Ideas
- Snowy Cookie Display: Arrange cookies on a white platter with sprigs of mint and crushed candy cane sprinkled between.
- Gift Boxes: Stack them in small tins lined with parchment and a dusting of extra powdered sugar they look like little edible snowballs.
- Cookie Platter Combo: Pair them with bright treats like our Baby Lemon Impossible Pies Recipe for a colorful winter mix.
And if you’re hosting, serve them as the final bite after dinner alongside coffee or peppermint tea it’s a simple, elegant finish to a holiday meal.
Quick Serving Table
| Occasion | Serving Tip |
|---|---|
| Christmas Brunch | Pair with hot cocoa and cranberry muffins |
| Holiday Dinner | Serve with espresso or mint tea |
| Cookie Exchange | Package in powdered sugar-dusted tins |
| Kids’ Party | Offer with warm milk or mini marshmallows |
When you bring these cookies out, everyone’s face lights up it’s that combination of soft sweetness and cool peppermint that instantly feels like the holidays.
Top Tips for Perfecting Peppermint Snowball Cookies
Holiday cookies might be simple, but there’s an art to getting that perfect melt-in-your-mouth texture. With these insider tricks, your Peppermint Snowball Cookies will look bakery-beautiful and taste even better. Each batch will come out tender, snowy, and full of peppermint cheer.
1. Cream Butter and Sugar Thoroughly
That first step is key. Creaming creates air pockets, giving your cookies a lighter texture. Use room-temperature butter soft enough to press but not greasy. Beat with powdered sugar for at least two minutes until it’s pale and fluffy. This ensures your cookies won’t turn dense.
2. Don’t Overmix the Dough
Once you add the flour, mix only until you no longer see streaks. Overmixing toughens the dough and ruins that delicate, shortbread-like crumb. The dough should be smooth, soft, and slightly cool to the touch before chilling.
3. Chill Before Baking
Cold dough equals thick, round cookies. Chilling also deepens the peppermint flavor and keeps the cookies from spreading too much. Thirty minutes in the fridge (or fifteen in the freezer if you’re in a hurry) makes all the difference.
4. Perfect the Snowball Coating
| Stage | Action |
|---|---|
| Warm Coating | Roll cookies once while they’re slightly warm this helps sugar stick beautifully. |
| Cool Coating | Roll again when completely cool for that signature snowball look. |
| Extra Finish | Sift a final dusting of powdered sugar just before serving. |
This double-coating trick gives your cookies that dreamy, frosted appearance.
5. Add Color Carefully
If you’re using food coloring, start small a drop or two is plenty. You want a soft blush pink, not candy red. Gel color works best since it doesn’t thin the dough.
6. Bake Just Until Set
Keep a close eye on your cookies near the end of baking. You’re aiming for pale, not brown. Once the bottoms show a hint of golden, they’re done. Overbaking will make them dry instead of tender.
7. Store Them Right
Keep snowball cookies in an airtight container at room temperature for up to four days. If stacking, layer parchment between rows to protect the sugar coating. You can also freeze uncoated cookies for up to two months just thaw and coat fresh before serving.
8. Nora’s Bonus Trick: Add a Holiday Twist
Want something extra special? Try rolling the cookies in a mix of powdered sugar and crushed candy canes for sparkle and crunch. It gives them a pretty red shimmer that stands out on any cookie tray.
These tips will make every batch look as festive as they taste perfect to pair with our Christmas Sugar Cookie Cheesecake or share alongside No-Bake Coconut Cream Balls for a snowy, sweet assortment.
Storing and Reheating Tips
One of the reasons I adore Peppermint Snowball Cookies besides how pretty they look is that they store beautifully.Prepping ahead or saving leftovers — stores and reheats well.), these little snowballs keep their buttery texture and fresh peppermint flavor for days with the right care.
How to Store
| Storage Method | How to Do It | Shelf Life |
|---|---|---|
| Room Temperature | Place cooled cookies in an airtight tin or sealed container lined with parchment. | 4 days |
| Refrigerator | Store in a covered container to prevent moisture absorption. Bring to room temp before serving. | 1 week |
| Freezer (Uncoated) | Freeze cookies in a single layer. Thaw at room temp, then coat with powdered sugar before serving. | 2 months |
If you’re gifting them, layer cookies with parchment to prevent sticking. The sugar coating can smudge if pressed tightly, so give them a bit of breathing room.
Best Way to Refresh
Snowball cookies are best served at room temperature, but if you’ve stored them in the fridge or freezer, here’s how to bring them back to life:
- For a quick refresh: Let cookies sit at room temp for about 30 minutes before serving.
- For slightly warm cookies: Place on a baking sheet and warm at 275°F for 5 minutes, then re-roll lightly in powdered sugar.
- For frozen dough: Bake straight from frozen just add 1 extra minute to the bake time.
They’ll come out just as soft and crumbly as the day you made them.
Make-Ahead Tips
The dough for Peppermint Snowball Cookies can be made up to 2 days ahead. Just refrigerate it in a tightly sealed bowl, then scoop and bake straight from the fridge. Chilled dough actually enhances flavor and color, making your cookies taste even better.
If you’re baking multiple batches, I recommend preparing the dough in advance and freezing portions. It’s the easiest way to have warm, freshly baked cookies ready for any holiday moment.
Storage Tip from Nora
For gifting or cookie swaps, I love packing these cookies with other winter favorites like our No-Bake Coconut Cream Balls and Baby Lemon Impossible Pies Recipe. The colors and textures together make every box look beautifully festive.
And don’t forget to store a secret stash for yourself you’ll thank me later when you need a quiet, cozy treat after wrapping presents!
FAQs About Peppermint Snowball Cookies
Can I use candy canes instead of peppermint baking chips?
Absolutely! Crush candy canes finely and fold them into the dough. They’ll melt slightly during baking, leaving sweet red swirls throughout. It gives a beautiful festive look similar to the vibe of our Christmas Sugar Cookie Cheesecake.
Can I make these cookies ahead of time for a holiday party?
Yes! These cookies actually taste better the next day as the peppermint flavor deepens. Store them in airtight containers, and re-roll in powdered sugar before serving for a fresh, snowy finish. They pair wonderfully with make-ahead desserts like our No-Bake Coconut Cream Balls.
Can I use different flavors instead of peppermint?
You sure can. Try almond extract for a nutty twist, or vanilla extract for a more classic shortbread flavor. Swap the peppermint chips for mini chocolate chips for a winter spin that’s perfect with cocoa.
What’s the secret to the best texture?
Room-temperature butter, properly creamed, is key. And always double-roll in powdered sugar once warm, once cool. That’s how you get that beautiful, even snow-like coating that makes these cookies melt on your tongue.
Why do my cookies crumble too much?
If your dough feels too dry, try adding a tablespoon of softened butter or a teaspoon of milk. Also, be sure not to overbake. The cookies should be barely golden on the bottom just set, not crisp.
How do I keep my Peppermint Snowball Cookies from going flat?
Make sure to chill your dough for at least 30 minutes before baking. Cold dough holds its shape, while warm dough spreads. Also, don’t overmix once you add the flour this keeps the cookies soft, not dense.
These cookies aren’t just delicious they’re memories baked in sugar and peppermint.Sweet craving or a special treat — this one delivers every time.
We’re Emma and Ella, and this cozy recipe from Emma & Ella brings the best of home baking to your holidays. Follow us for more nostalgic treats on Pinterest or share your cookie creations on our Facebook page we love seeing your Christmas magic come to life.

Peppermint Snowball Cookies
- Total Time: 23 min
- Yield: 24 cookies 1x
- Diet: Vegetarian
Description
Soft, buttery Peppermint Snowball Cookies dusted with powdered sugar and filled with cool peppermint flavor. These melt-in-your-mouth Christmas cookies bring cozy winter vibes and holiday joy to every bite.
Ingredients
Cookies:
1 cup unsalted butter, softened
⅔ cup powdered sugar, sifted
2¼ cups all-purpose flour
½ teaspoon salt
1 teaspoon peppermint extract
Red or pink food coloring, a few drops
¾ cup Andes peppermint baking chips
Coating:
Powdered sugar for rolling and dusting
Instructions
- Cream Butter: Beat butter and powdered sugar for 2 minutes until light and fluffy.
- Add Dry Ingredients: Mix in flour, salt, and peppermint extract until just combined.
- Color & Chips: Add food coloring and fold in peppermint baking chips.
- Chill Dough: Cover and refrigerate for 30 minutes.
- Shape & Bake: Roll into 1 tbsp balls. Bake at 375°F for 7–8 minutes, just until set.
- Coat: Roll warm cookies in powdered sugar, then again once cool for a snowy finish.
Notes
Cool cookies before final coating to prevent melting. Store airtight at room temperature for up to 4 days. Freeze uncoated cookies for up to 2 months and re-roll in sugar after thawing for best texture.
- Prep Time: 15 min
- Cook Time: 8 min
- Category: Baked Desserts
- Method: Baking
- Cuisine: American
Nutrition
- Serving Size: 1 cookie
- Calories: 120
- Sugar: 9g
- Sodium: 40mg
- Fat: 7g
- Saturated Fat: 4g
- Unsaturated Fat: 2g
- Trans Fat: 0g
- Carbohydrates: 13g
- Fiber: 0g
- Protein: 1g
- Cholesterol: 15mg

Must‑Have Kitchen Equipment for This Recipe:
- Instant Pot Duo Plus 6‑Qt 9‑in‑1 Programmable Pressure Cooker
- Instant Vortex Plus 6‑Qt Air Fryer (ClearCook + OdorErase)
- Aucma 6.5‑Qt 6‑Speed Tilt‑Head Stand Mixer
Some links may be affiliate links. Read our affiliate disclosure.


Ratings & Reviews
Leave a reviewWe'd love to hear how it turned out.