
Earl Grey Chocolate Tart
This Earl Grey Chocolate Tart features a crisp coconut chocolate crust filled with a silky, tea-infused chocolate crémeux. The balance of rich chocolate and citrusy Earl Grey creates an elegant dessert perfect for special occasions or refined everyday treats.

By Emma & Ella FrostUpdated April 11, 2026

- Prep Time
- 30 min
- Cook Time
- 15 min
- Total Time
- 285 min
- Servings
- 8 servings

5-Ingredient Dump & Go Crockpot Meals
101 effortless slow cooker recipes for busy families.
View on AmazonAvailable on AmazonThese Earl Grey Chocolate Tart layers create a rich, silky dessert that blends fragrant tea with deep chocolate in a refined way. The crisp coconut crust adds texture, while the creamy filling melts smoothly with every bite. This tart feels special yet stays simple enough to prepare at home.
This recipe shows exactly how to make Earl Grey Chocolate Tart step by step.
What is Earl Grey Chocolate Tart
An Earl Grey Chocolate Tart is a layered dessert that combines tea-infused cream with chocolate to create a smooth, custard-like filling. The flavor comes from Earl Grey tea, which carries notes of bergamot, giving the tart a light citrus aroma that balances the richness of chocolate.
Unlike traditional chocolate tarts, this version introduces depth through tea infusion. As a result, every slice offers a more complex taste without feeling heavy.
The base often uses a pressed crust, like coconut and chocolate, instead of a baked pastry shell. Because of that, the texture becomes both crisp and slightly chewy, which pairs beautifully with the silky filling.
Why You’ll Love This Earl Grey Chocolate Tart
This Earl Grey Chocolate Tart stands out for both flavor and texture. While many chocolate desserts lean overly sweet, this one feels balanced and refined.
First, the Earl Grey infusion adds a subtle floral citrus note. Then, the chocolate brings richness without overwhelming the palate. Together, they create a layered taste that feels complete.
You’ll also love how approachable it is. Even though it looks elegant, the process stays straightforward. The crust comes together quickly, and the filling sets beautifully in the fridge.
If you enjoy chilled desserts like strawberry cream cheese icebox cake or quick treats such as no bake peanut butter oat cups, this tart fits right into your rotation.
How to Make Earl Grey Chocolate Tart
Quick Overview
This recipe builds in two main parts: a coconut chocolate crust and a tea-infused chocolate crémeux. After assembling, the tart chills until firm.
Ingredients
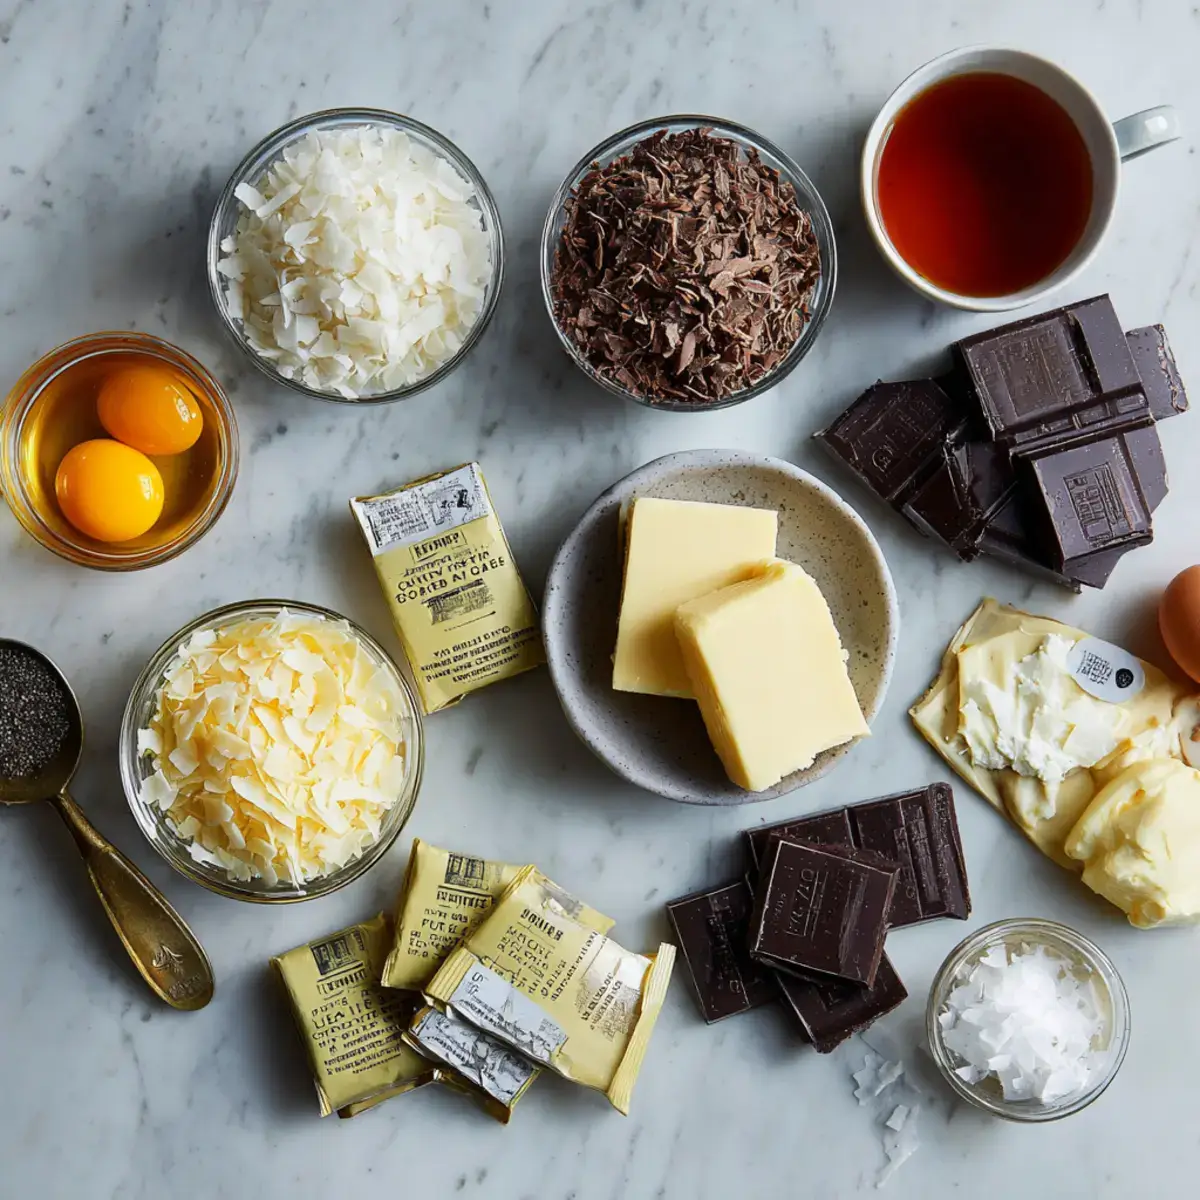
For the Coconut Crust
| Step | What Happens |
|---|---|
| Prepare crust | Toast coconut and mix with melted chocolate |
| Press and chill | Shape crust and firm it in the fridge |
| Make filling | Infuse tea and cook into creamy mixture |
| Assemble | Pour filling into crust |
| Chill | Let tart set until sliceable |
For the Earl Grey Crémeux
| Ingredient | Amount |
|---|---|
| Earl Grey tea | 2 bags |
| Boiling water | ½ cup |
| Milk chocolate | 5.3 ounces |
| Egg | 1 large |
| Cornstarch | 2 tablespoons |
| Heavy cream | ¾ cup |
| Butter | 3 tablespoons |
Step-by-Step Instructions
Step 1: Prepare the Pan
Line a 9-inch tart pan with crumpled parchment. This helps remove the tart later without damage.
Step 2: Toast the Coconut
Spread coconut flakes on a baking sheet and bake at 325°F for about 10 minutes. Stir halfway through so the color stays even. Let them cool completely.
Step 3: Melt Chocolate
Melt dark chocolate slowly using a double boiler or microwave in short bursts. Stir until smooth.
Step 4: Combine Crust
Lightly crush the coconut flakes, then mix them into the melted chocolate with salt. Stir until evenly coated.
Step 5: Shape the Crust
Press the mixture into the pan. Make sure the base and sides stay even and firm. Chill for 20–30 minutes.
Step 6: Steep the Tea
Pour boiling water over Earl Grey tea. Let it steep for about 20 minutes until strong and aromatic.
Step 7: Prepare Base Mixture
Whisk egg and cornstarch in a saucepan. Then add heavy cream and mix until smooth.
Step 8: Add Tea
Remove tea bags and press out the liquid. Stir the tea into the saucepan mixture.
Step 9: Cook the Crémeux
Cook over medium heat, whisking constantly. The mixture thickens within a few minutes. Lower heat, then stir in butter.
Step 10: Combine with Chocolate
Pour the hot mixture over chopped milk chocolate. Let sit briefly, then whisk until smooth. Add a pinch of salt.
Step 11: Assemble the Tart
Pour the filling into the chilled crust. Smooth the surface with a spatula.
Step 12: Chill
Refrigerate for at least 4 hours, preferably overnight, until fully set.
Step 13: Finish
Grate dark chocolate over the top. Add edible flowers if desired. Let sit at room temperature before slicing.
What to Serve Earl Grey Chocolate Tart With
This tart pairs well with light, refreshing sides. Because the flavor feels rich, balance matters.
Fresh berries bring brightness. A spoonful of whipped cream softens the texture. Even a simple tea pairing works beautifully.
If you enjoy combining desserts, you can serve small portions alongside treats like oatmeal no bake cookies or strawberry crunch cheesecake bites.
Top Tips for Perfecting Earl Grey Chocolate Tart
Small adjustments make a big difference in this recipe.
First, steep the tea long enough. A weak infusion reduces the signature flavor. On the other hand, strong tea gives the tart its identity.
Next, whisk constantly while cooking the filling. This keeps the texture smooth and prevents lumps.
Also, press the crust firmly. Any gaps may cause the filling to leak or crack.
Finally, allow proper chilling time. The tart needs several hours to fully set and slice cleanly.
Storing and Reheating Tips
Store the Earl Grey Chocolate Tart in the refrigerator, covered tightly. It stays fresh for up to 3 days.
For best texture, let slices sit at room temperature before serving. This softens the filling slightly and improves flavor.
Avoid freezing if possible. While it can work, the texture may change once thawed.
FAQs
What does Earl Grey taste like in desserts?
Earl Grey adds a light citrus note from bergamot. It complements chocolate without overpowering it.
Can I use loose-leaf tea instead of tea bags?
Yes. Use about 2 tablespoons of loose tea for the same strength.
Why is my filling not setting?
The mixture likely needs more cooking time or longer chilling. Both steps are important for firmness.
Can I make this ahead of time?
Yes. This tart actually improves after resting overnight in the fridge.
What chocolate works best?
Use good-quality chocolate for both crust and filling. It affects both texture and flavor.
We’re Emma and Ella, twin sisters who grew up loving no-bake desserts. From cheesecakes to icebox pies, we share cool, simple recipes made for busy lives. No ovens, no stress, just sweet moments worth sharing.
This Earl Grey Chocolate Tart brings together elegance and comfort in one beautiful dessert. With its smooth filling, crisp crust, and fragrant tea notes, it feels both refined and approachable. Try it once, and it easily becomes a standout addition to your dessert lineup.
For more ideas and inspiration, visit The Cooking Twins Facebook and The Cooking Twins Pinterest.
Earl Grey Chocolate Tart
- Total Time: 285 min
- Yield: 8 servings 1x
- Diet: Vegetarian
Description
This Earl Grey Chocolate Tart features a crisp coconut chocolate crust filled with a silky, tea-infused chocolate crémeux. The balance of rich chocolate and citrusy Earl Grey creates an elegant dessert perfect for special occasions or refined everyday treats.
Ingredients
3 cups unsweetened coconut flakes
6 ounces dark chocolate, chopped
1/4 teaspoon fine sea salt
2 Earl Grey tea bags or 2 tablespoons loose-leaf Earl Grey tea
1/2 cup boiling water
5.3 ounces milk chocolate, finely chopped
1 large egg
2 tablespoons cornstarch
3/4 cup heavy cream
3 tablespoons unsalted butter, cut into pieces
Pinch of fine sea salt
1/2 ounce dark chocolate, for grating
Edible flowers (optional)
Instructions
- Prepare Pan: Line a 9-inch tart pan with crumpled parchment paper for easy removal.
- Toast Coconut: Bake coconut flakes at 325°F for about 10 minutes, stirring halfway, until golden. Cool completely.
- Melt Chocolate: Melt dark chocolate using a double boiler or microwave in short bursts, stirring until smooth.
- Mix Crust: Lightly crush coconut flakes, then mix with melted chocolate and salt until evenly coated.
- Form Crust: Press mixture firmly into the bottom and sides of the pan, ensuring no gaps. Chill for 20–30 minutes until firm.
- Steep Tea: Pour boiling water over Earl Grey tea and steep for 20 minutes until strong and fragrant.
- Whisk Base: In a saucepan, whisk egg and cornstarch until smooth, then whisk in heavy cream.
- Add Tea: Remove tea bags, squeezing out liquid, and whisk tea into the cream mixture.
- Cook Crémeux: Cook over medium heat, whisking constantly until thickened, about 2–4 minutes.
- Finish Filling: Reduce heat, whisk in butter, then pour mixture over chopped milk chocolate. Let sit briefly and whisk until smooth. Add salt.
- Assemble Tart: Pour filling into chilled crust and smooth the surface evenly.
- Chill Tart: Refrigerate for at least 4 hours or overnight until fully set.
- Finish Tart: Remove from pan, grate dark chocolate on top, and add edible flowers if desired before serving.
Notes
Steep the tea fully for strong flavor that balances the chocolate.
Use high-quality chocolate for the smoothest texture and best taste.
Chill overnight for clean slices and optimal consistency.
Let the tart sit at room temperature before serving for a softer texture.
- Prep Time: 30 min
- Cook Time: 15 min
- Category: Dessert
- Method: No-Bake
- Cuisine: American
Nutrition
- Serving Size: 1 slice
- Calories: 430
- Sugar: 24g
- Sodium: 130mg
- Fat: 31g
- Saturated Fat: 19g
- Unsaturated Fat: 10g
- Trans Fat: 0g
- Carbohydrates: 36g
- Fiber: 3g
- Protein: 5g
- Cholesterol: 75mg
Must‑Have Kitchen Equipment for This Recipe:
- Instant Pot Duo Plus 6‑Qt 9‑in‑1 Programmable Pressure Cooker
- Instant Vortex Plus 6‑Qt Air Fryer (ClearCook + OdorErase)
- Aucma 6.5‑Qt 6‑Speed Tilt‑Head Stand Mixer
Some links may be affiliate links. Read our affiliate disclosure.


Ratings & Reviews
Leave a reviewWe'd love to hear how it turned out.