
No Bake Cheesecake Filling
This quick and creamy no bake cheesecake filling is made with just 5 ingredients and ready in 15 minutes. Perfect for pies, parfaits, or layered desserts.

By Emma & Ella FrostUpdated June 13, 2026

- Prep Time
- 15 min
- Cook Time
- 0 min
- Total Time
- 15 min
- Servings
- 2 cups

5-Ingredient Dump & Go Crockpot Meals
101 effortless slow cooker recipes for busy families.
View on AmazonAvailable on AmazonThis no bake cheesecake filling is creamy, smooth, and ready in just 15 minutes. Perfect for pies, parfaits, and more, this chilled treat delivers cheesecake flavor without the oven. Whether layered in desserts or enjoyed by the spoonful, it’s a versatile go-to. For a classic version, our Philadelphia no bake cheesecake uses simple ingredients and sets beautifully in the fridge. See also our No-Bake Japanese Yogurt Cheesecake (Ultra Light…. See also our No Bake Pumpkin Cheesecake Balls. See also our Creamy Bacon Portobello Mushroom Gratin. See also our Bacon Cheeseburger Tortellini. See also our Creamy Mexican Street Corn Cup. See also our Lazy Cheeseburger Slider Recipe. See also our Creamy Cheesy Cabbage Casserole. See also our Mexican Green Chile, Chicken & Cheese Enchiladas. See also our Cheesy Mozzarella Stuffed Onion Rings. See also our Mexican Casserole with Ground Beef. See also our Chicken Burrito Casserole with Rice. See also our 2 Ingredient Onion Ring Chips. See also our Best Creamy Potato Recipe. See also our 10-Inch Deep Dish Pumpkin Pie. See also our Green Goddess Chicken Salad with Crispy Chickpeas. See also our Jersey Mike's Chicken Salad Recipe…. See also our Creamy Cucumber Salad with Bacon and Cheddar. See also our 2 Ingredient Japanese Cheesecake No Bake. See also our Taco Bell Mexican Pizza Copycat. See also: enoki-beef-rolls-recipe. See also: gumbo-greens-with-cabbage-for-dinner.
Table of Contents
Table of Contents
Intro & Personal Story
What is No Bake Cheesecake Filling?
There’s just something magical about cheesecake especially the kind you can make without ever turning on the oven. No bake cheesecake filling is a rich, velvety blend of whipped cream and softened cream cheese, sweetened with powdered sugar and kissed with vanilla. It’s used as the base for many quick and creamy chilled desserts, from parfaits and trifles to pies and cookie sandwiches. See also our How to Make Fried Potatoes in a Skillet. See also our Cream Cheese Cookies Christmas. See also our Cream Cheese & Bacon Stuffed Doritos. See also our Fleming's Potatoes (Copycat Au Gratin Favorite). See also our Dofinwar Potatoes Recipe. See also our Bacon Cheeseburger Rice Stack. See also our Christmas Raspberry Cream Cookies. See also our Sweet Sin Jelly Shots. See also our Christmas Pinwheel Cookies. See also our Christmas Tree Brownies. See also our Raspberry Cheesecake Stuffed Donuts. See also our Red Velvet Wreath Whoopie Pies. See also our Pink Chocolate-Chip Cookie Dough Brownie…. See also our Chocolate Covered Strawberry Poke Cake. See also our Chocolate Cherry Pie Filling Cake. See also our Olympic Chocolate Muffins. See also our Copycat McCormick Spaghetti Seasoning Recipe. See also our S’mores Cookie Recipe (Ultimate Gooey…. See also our Taylor Swift Chai Cookie. See also our Santa’s No-Bake Sugar Cookie Bars. See also: fireball-cherry-bombs. See also: cherry-garcia-loaf-cake.
Unlike baked cheesecakes that require careful timing and water baths, this no bake version is all about simplicity. It sets in the fridge, holds its shape beautifully, and tastes like the real deal. Whether spooned into a crust or piped between cookies, it’s pure, creamy bliss in every bite. See also our Baked Eggplant Parmesan No Breading. See also our Baked Spinach Mushroom Quesadillas. See also our Baked Enchilada Chicken.
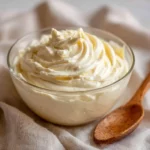
No Bake Cheesecake Filling
- Total Time: 15 min
- Yield: 2 cups 1x
- Diet: Gluten Free
Description
This quick and creamy no bake cheesecake filling is made with just 5 ingredients and ready in 15 minutes. Perfect for pies, parfaits, or layered desserts.
Ingredients
2 cups heavy whipping cream, cold from the fridge
16 ounces cream cheese (block style), softened at room temperature
2 cups confectioners sugar (260 grams)
2 teaspoons pure vanilla extract
Instructions
- Place heavy cream in: Place heavy cream in a bowl of a stand mixer or handheld mixer fitted with the whisk attachment. Beat for 4-8 minutes or until medium-stiff peaks form.
- Transfer whipped cream to: Transfer whipped cream to another bowl and set aside.
- In the empty mixer: In the empty mixer bowl, add cream cheese and sift confectioners sugar on top. Beat for 3-5 minutes until smooth.
- Add 1/4 cup of: Add 1/4 cup of whipped cream at a time and gently mix on low speed or fold with a spatula until combined.
- Mix in vanilla extract: Mix in vanilla extract for 10-20 seconds.
- Refrigerate for at least: Refrigerate for at least 30 minutes before using for best spreadable consistency.
Notes
Ways to use it: in pies, parfaits, sandwich cookies, or layered cakes.
Store in refrigerator for up to 5 days.
Can be made dairy-free with Tofutti cream cheese and plant-based cream.
Double the recipe for layered cakes or parfaits.
- Prep Time: 15 min
- Category: Dessert
- Method: No Bake
- Cuisine: American
Nutrition
- Serving Size: 1 cup
- Calories: 1526
- Sugar: 137g
- Sodium: 1659mg
- Fat: 88g
- Saturated Fat: 56g
- Unsaturated Fat: 26g
- Trans Fat: 0g
- Carbohydrates: 144g
- Fiber: 0g
- Protein: 42g
- Cholesterol: 296mg
Why You’ll Love It
We still remember the first time we made this no bake cheesecake filling as kids. It was a summer afternoon, and our kitchen was a mess of powdered sugar and smiles. No oven, no stress just two sisters and a handheld mixer making dessert magic. That’s when we fell in love with no bake cheesecake.
You’ll love this recipe for so many reasons. First, it’s fast ready in 15 minutes. Second, it’s versatile you can pour it into a crust, layer it into parfaits, or eat it by the spoonful. Third, it’s reliable this no bake cheesecake filling always turns out thick, fluffy, and delicious. And finally, it’s naturally gluten free, with easy swaps for a dairy-free version too. See also our Gluten Free Pizza Crust Recipe. See also our Recipe for a 7 Up Pound Cake. See also our Chicken Adobo. See also our Chick Fil A Coleslaw Released. See also our Stoved Chicken Recipe. See also our Chicken Salad Chick Classic Carol: A Comforting Copycat. See also our Nariyal Chicken Recipe. See also our Chicken Shrimp & Spinach Quesadillas. See also our Chicken and Ham Pot Pie with Creamy Vegetable Filling. See also our Pizza Style Cottage Cheese Bake. See also our Shrimp Crab Melts. See also our Delicious Apple Juice Pie Recipe. See also our 30 Cottage Cheese Desserts (High-Protein,…. See also: chinese-coleslaw-recipe-with-ramen-noodles. See also: crab-brulee-recipe.
For a no bake dessert, it delivers big on flavor and even bigger on texture. Creamy, fluffy, and just sweet enough, this filling is what dessert dreams are made of. And the best part? It’s made from just a handful of fridge and pantry staples.
You’ll want to keep this recipe bookmarked for last-minute gatherings, summer treats, or those cozy nights when turning on the oven is just not happening. Once you try it, we’re pretty sure it’ll become your go-to filling for any no bake cheesecake dessert. See also our Pretty Pink Champagne Cake.
Use this base to make endless desserts from our 15 No-Bake Cheesecake Recipes That Taste Like Pure Summer.
Quick Overview
How This Filling Comes Together (Time, Tools, Effort)
No bake cheesecake filling is all about ease. With just 15 minutes of prep and zero baking time, this creamy dream is perfect for anyone short on time but big on flavor. All you need is a hand or stand mixer, a mixing bowl, and a spatula.
Once you’ve whipped the cream and blended the softened cream cheese with sugar and vanilla, just fold it all together. It becomes light, fluffy, and rich in minutes. For best results, chill the filling for at least 30 minutes before using it firms up just enough for scooping or spreading.
We use this same technique in desserts like our No Bake Flag Cheesecake and it’s also the secret behind the layers in our No Bake Oreo Lasagna.
What Makes It So Versatile
No bake cheesecake filling is one of the most adaptable desserts in our kitchen. You can:
- Pipe it into jars with cookies or cake for mini cheesecake parfaits
- Pour it into a graham crust and chill for a simple pie
- Spoon it into cupcake liners for no-fuss cheesecake bites
- Sandwich it between cookies or layer in a trifle dish
Its thick texture is spreadable, pipeable, and spoonable without turning on your oven. Plus, it’s naturally gluten free, and can be made dairy free with simple swaps. See also our Pistachio-Crusted Brie Bites with Raspberry Honey Glaze. See also our Pistachio & Blackberry Cheesecake Towers. See also our Black Forest Cheesecake Symphony. See also our Pistachio & Chocolate Leprechaun Cookies. See also: golden-christmas-tree-puff-pastry-with-brie-cranberries-pistachios.
Ingredients
Ingredient Breakdown (with Simple Substitutions)
The beauty of this no bake cheesecake filling is how simple the ingredient list is. Just five pantry and fridge staples come together to create that classic creamy texture and sweet cheesecake flavor without eggs or gelatin.

Here’s what you’ll need:
- 2 cups heavy whipping cream, cold from the fridge
- 16 ounces cream cheese (use block style, softened at room temperature)
- 2 cups confectioners’ sugar (about 260 grams)
- 2 teaspoons pure vanilla extract
- Optional: pinch of salt to balance sweetness
That’s it. Just five ingredients for a smooth and fluffy cheesecake base.
We always recommend using full-fat cream cheese for the richest texture. Avoid whipped or tub-style versions, which contain added air and won’t set up the same. If you’re dairy-free, you can substitute with Tofutti cream cheese and a plant-based whipping cream we’ve tested it in recipes like our No Bake Coconut Cream Pie with great results.
Why Each One Matters for Texture & Flavor
- Heavy Whipping Cream: This is where the lightness comes from. When whipped, it adds volume and that dreamy, mousse-like texture.
- Cream Cheese: The base of any good cheesecake. It gives structure and that signature tangy richness.
- Confectioners’ Sugar: Unlike granulated sugar, this dissolves easily into the cream cheese, ensuring a silky-smooth finish.
- Vanilla Extract: Just enough to warm and deepen the flavor. Don’t skip it!
- Salt (optional): A tiny pinch enhances the tang of the cream cheese and balances the sweetness beautifully.
Once combined, these ingredients create a filling that’s rich, creamy, and perfect for any chilled dessert from cheesecakes and trifles to layered bars and cookie cups like our Peanut Butter No Bake Cups. See also our Tangy Pickled Eggs with Sausage and Onions. See also: haunted-dill-pickle-cheese-ball.
Step-by-Step Instructions
Step 1: Whip the Cream to Medium-Stiff Peaks
Start by pouring 2 cups of cold heavy whipping cream into the bowl of a stand mixer or use a large bowl with a handheld electric mixer. Fit with the whisk attachment.
Whip on medium-high speed for 4 to 8 minutes, or until the cream holds medium-stiff peaks. That means it stands tall with a gentle curl at the tip. Watch closely overbeating can quickly turn it into butter.
Once whipped, transfer the cream to a separate bowl and refrigerate while you prep the next part.
Step 2: Beat the Cream Cheese & Sugar Until Smooth
Using the same mixing bowl (no need to clean it), add 16 ounces of softened cream cheese. Sift 2 cups of confectioners’ sugar directly on top to avoid clumps.
Switch to the paddle attachment and beat on medium speed for 3 to 5 minutes, until the mixture is thick, smooth, and free of lumps. Scrape down the bowl as needed.
This creamy base gives the cheesecake filling its iconic tang and velvety texture just like we use in our No Bake Easter Cheesecake.
Step 3: Fold in the Whipped Cream
Now it’s time to gently bring it all together.
Add about ¼ cup of whipped cream at a time to the cream cheese mixture. Fold using a spatula or mix on low speed until just combined. Repeat until all the whipped cream is fully incorporated.
Take care not to deflate the air. This step is where the filling gets its cloud-like texture.
Step 4: Mix in Vanilla and Chill
Finally, add 2 teaspoons of vanilla extract and mix briefly just 10 to 20 seconds.
For best results, cover and refrigerate the no bake cheesecake filling for at least 30 minutes before using. This firms it up and gives the filling the perfect consistency for piping or spreading into desserts like our No Bake Moose Farts or no bake tarts.
Serving Suggestions
Layer It, Pipe It, or Spoon It This Filling Does It All
This no bake cheesecake filling is one of the most versatile dessert bases you’ll ever make. With its thick, fluffy texture and creamy flavor, it pairs beautifully with a wide range of ingredients and dessert formats.
Here’s how we love using it:
- Fill a no bake pie crust: Spoon it into a graham cracker or cookie crust and chill for 3–5 hours for a classic no bake cheesecake.
- Layer into parfaits: Alternate the filling with crushed cookies, cake cubes, or fruit. It’s a favorite in our High Protein Cheesecake Jars.
- Pipe into jars or cups: For a party-friendly treat, pipe the filling into individual dessert cups or shot glasses.
- Spread between cake layers: Make a filled cake without buttercream like we do in our Cheesecake and Brownie Cake.
- Use as cookie filling: Sandwich between soft cookies for a dessert that tastes like mini cheesecakes.
Make It Your Own with Flavors and Toppings
Because this filling starts with such a neutral base, you can easily customize it to fit any occasion. Here are a few flavor ideas to try: See also our Protein Loaded Sweet Potato Boats. See also our Loaded Italian Subs Topped with…. See also our Loaded Baked Potato with Steak,…. See also our Loaded Bacon Cheeseburger Steak & Potato Skillet. See also our Juneteenth Food Ideas: 18+ Red…. See also: cheesy-chilli-with-sweet-potato-mash.
- Citrus Zest: Add lemon, lime, or orange zest for a bright, tangy twist.
- Swirls: Fold in a spoonful of jam, lemon curd, or chocolate ganache.
- Spices: Mix in cinnamon, nutmeg, or pumpkin spice for fall-inspired parfaits.
- Toppings: Try fresh fruit, crushed cookies, whipped cream, or chopped nuts for finishing touches.
Want to dress it up for a holiday? Layer it with red and blue berries like we did in our No Bake Flag Cheesecake the filling stays fluffy and holds its shape beautifully. See also our 3-Ingredient Orange Chicken. See also our Fresh Made Bagels. See also our Chocolate Peanut Butter Snowballs with Caramel Drizzle. See also our Orange Dreamsicle Salad. See also our Orange Creamsicle Buttercream Icing. See also our A Lemon Cake To Die For.
Pro Tips & Storage
How to Get the Perfect Texture Every Time
Getting your no bake cheesecake filling to turn out fluffy and smooth is easy but a few tips will make it flawless every time:
- Use cold heavy cream: It whips faster and holds peaks better. Warm cream won’t give you volume.
- Soften the cream cheese fully: Take it out of the fridge at least 30 minutes ahead so it blends without lumps.
- Whip cream separately: Don’t shortcut this step. Folding in whipped cream keeps the filling light and airy.
- Mix gently: When combining the cream cheese and whipped cream, use a folding motion or low-speed mixer. Overmixing deflates the air.
This technique works just as well in rich layered desserts like our Peanut Butter Cup Icebox Cake where structure and softness both matter.
Want an extra-firm set? Chill the filling in the fridge for a few hours or overnight before using. See also our Overnight Oats Recipe with Yogurt.
How to Store It (and Freeze It, Too)
No bake cheesecake filling stores beautifully:
- In the fridge: Keep it in an airtight container for up to 5 days. Stir gently before using if it sits for more than a day.
- In the freezer: Yes, you can freeze it! Spoon it into a freezer-safe container and store for up to 1 month. Thaw in the fridge overnight and whip lightly before using.
If you’re using it in advance for parties or make-ahead desserts like Lazy Day Lemon Cream Pie Bars, store the assembled dessert and add toppings right before serving.
FAQs
Can I freeze no bake cheesecake filling?
Yes, you can freeze no bake cheesecake filling. Place it in an airtight container or resealable freezer bag and freeze for up to 1 month. When ready to use, thaw in the refrigerator overnight. Once thawed, give it a gentle stir or re-whip briefly to restore its fluffy texture.
Why is my no bake cheesecake filling runny?
If your no bake cheesecake filling is runny, it’s likely due to under-whipped cream or using cream cheese that wasn’t fully softened. Always beat the cream to medium-stiff peaks and let the cream cheese reach room temperature before mixing. Also, avoid using tub-style cream cheese or light versions, which contain more moisture.
How long does it take for cheesecake filling to set?
The filling itself is ready immediately after mixing, but for the best consistency especially for pies or layered cakes let it chill in the fridge for at least 30 minutes. For a firmer set that slices cleanly, chill for 3–5 hours, or overnight if possible.
Can I use this filling as frosting?
Absolutely! No bake cheesecake filling makes a fantastic frosting for cupcakes, snack cakes, and layered desserts. Pipe or spread it directly on top. It’s rich and creamy, yet lighter than buttercream. Try it on a banana or lemon cake for a tangy twist that holds its shape.
Conclusion
No bake cheesecake filling is one of those kitchen wins you’ll keep coming back to. It’s quick, reliable, and endlessly adaptable. Layer it into jars, spread it into a crust, or eat it straight from the bowl — we’ve done all three and have zero regrets (), it always delivers creamy, crowd-pleasing results.
Now that you’ve got the recipe and all the pro tips, it’s your turn to make dessert magic. Grab your mixer and whip up this fluffy, dreamy no bake cheesecake filling today. Let the chilling begin!
Follow us on Facebook and get inspired on Pinterest for more no bake cheesecake filling ideas and chilled dessert favorites.
Must‑Have Kitchen Equipment for This Recipe:
- Instant Pot Duo Plus 6‑Qt 9‑in‑1 Programmable Pressure Cooker
- Instant Vortex Plus 6‑Qt Air Fryer (ClearCook + OdorErase)
- Aucma 6.5‑Qt 6‑Speed Tilt‑Head Stand Mixer
Some links may be affiliate links. Read our affiliate disclosure.

Ratings & Reviews
Leave a reviewWe'd love to hear how it turned out.